Installing a Hard Drive
This tutorial on installing a hard drive, is one of the tutorials in the process of building your own computer. Hopefully you have installed your motherboard, power supply, CPU and RAM.
Preparation
This tutorial is on how to install a hard drive into a new computer that you are building and is not necessarily the process you would use if you were just installing a hard drive to an existing computer or adding a secondary drive.
If you still need to choose a hard drive then I suggest you do so now. Depending on your motherboard you will need to choose an IDE or Sata hard drive. It will also affect your choice of hard drive depending on what your budget is and what you are using it for.
Locating the Hard Drive trays
The first step in this tutorial on installing a hard drive is to locate the hard drive trays on the computer case. To do this you need to obviously open up your computer case and remove any cables that are connected to it. It is recommended that you use an antistatic wrist strap while working on your computer.
Once you have the case opened simply locate the hard drive trays which look similar to the image below.


![]()
Setting the Jumpers
This step is probably the most difficult step in the entire tutorial. However the newer SATA hard drives do not require you too set the jumpers so if you are using a SATA drive, you can skip this whole step. However if you are using IDE drives then you will need to set the jumpers.
To work out where the jumpers need to go you need to ask this question. How many drives (including cd/dvd drives) do you want to have in the computer?
If you only have two drives then you can leave the jumpers as default and just put each drive on a different cable. For example: One hard drive on one IDE cable and one CD drive on another IDE cable.
However if you want to have three or four drives then it is necessary to have two drives on the one IDE cable and then you need to set one drive as master and another as slave.
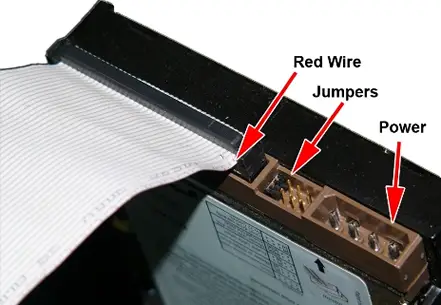
The image below should help you identify where the jumpers are on an IDE hard drive.

On the case of your hard drive it should tell you where the pin should be to make it a master, slave or cable select drive. Simply take the little jumper off one of the pins and put it on the appropriate pins.
Inserting the Hard Drive
The next step in this tutorial on installing a hard drive is inserting the hard drive into the tray that you located in step one. So take the hard drive, insert it into the tray and then place and tighten the screws in.
Installing the IDE cables
In this step we are simply connecting the cables from the motherboard and the power supply to the hard drive. The cables from the motherboard will either be the SATA cable or the IDE Cable. And the power cable will either be the normal peripheral power cable or the SATA power cable. So if you are using an IDE hard drive then you will use the IDE cables and those with the SATA drives will use SATA cables.
In the images I will be using the IDE cables but connecting SATA cables is very easy so you should have no problems.
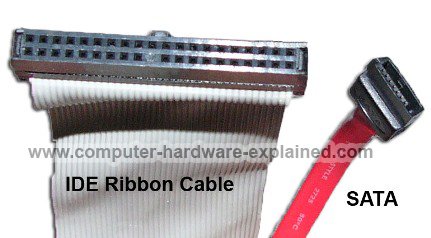
Connecting the IDE Cable

To connect the IDE cable simply place the IDE cable in the motherboard (like the image shows) and place one of the other ends into the hard drive.
Often the IDE cable will only go in one way.
Note – SATA cable users: The sata cable is very easy to install. It will only go in one way and you can see the SATA ports on the right (the red ports) in the image.
When inserting the IDE cable into the hard drive always place the red wire of the IDE cable closer to the power cable.
This can be seen by the image below.
Connecting the Power Cables
The next step in this tutorial on installing a hard drive is to connect the peripheral power cables. These will only ever go in one way and you can find a tutorial with images here.
Conclusion
This tutorial on installing a hard drive is complete. If you have been following the whole build your own computer guide, then you will be happy to know that you have now installed the most crucial components of your computer. Congratulations.
The next step in this guide is installing the CD/DVD drive. This tutorial should be quite easy for you as it is very similar to installing a hard drive.
Still need to buy a Hard Drives
![]() go to TigerDirect for some of the best deals online.
go to TigerDirect for some of the best deals online.
Go to how to install a CD/DVD drive
Go to Build Your Own Computer Guide
Leave Installing a Hard Drive and go to the Homepage